Calculation guide

Calcufloor calculates flooring from the generated layout.

You draw the room, enter the product and layout settings, then Calcufloor generates the layout and derives the resulting quantities from it.

Pattern, direction, and offset layout control where pieces are placed and where cuts fall. Every count is derived from that generated result.

Projects and areas

How projects and areas work in Calcufloor

The project system is the top-level structure in Calcufloor. A project contains one or more areas, and each area stores its own room shape and layout state.

What a project contains

A project groups related work together. In the projects panel, each project shows its project name, optional reference, modified time, total area, and number of areas.

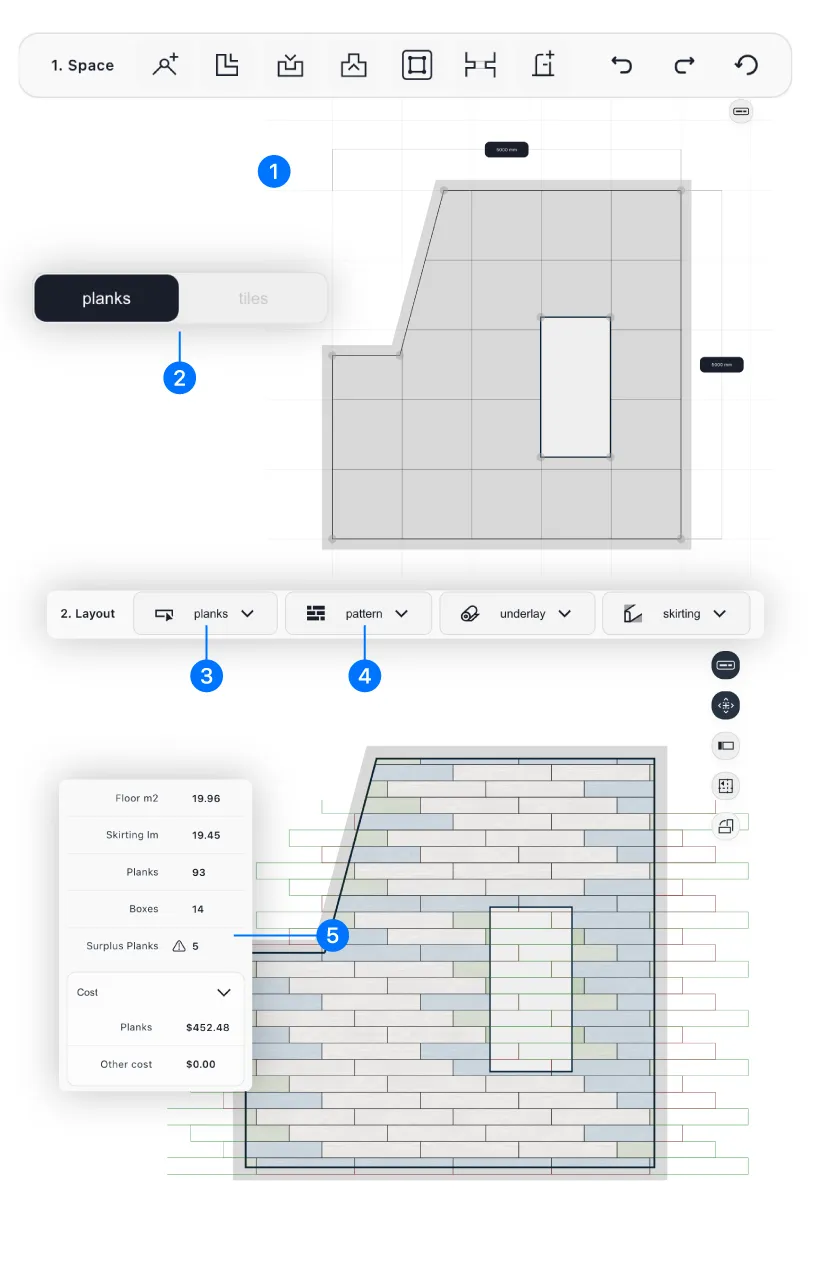
What an area contains

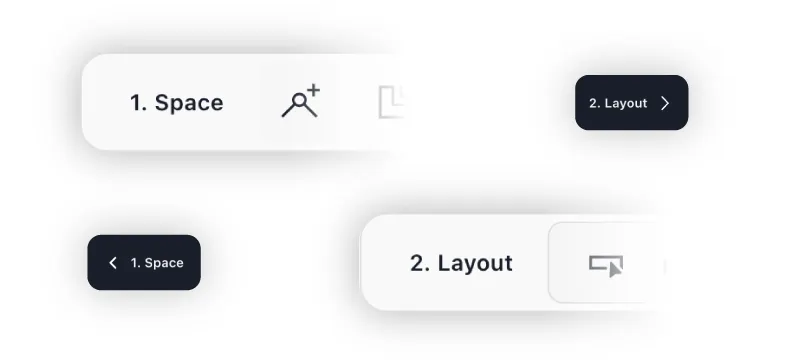
Each area stores its own geometry, active mode, settings, and 2. Layout layout state. That means one project can contain multiple separate rooms or floor plans, each with its own layout.

How areas are named

The first area uses the default name Area. Additional areas are numbered automatically as Area 2, Area 3, and so on. Project names and area names can both be renamed directly in the UI.

What happens when you open an area

When you open an area, Calcufloor loads that area's saved room shape, mode, settings, pattern state, and layout state, then updates the active project and area labels in the interface.

Why this matters

This is what lets you manage more than one room inside the same job instead of treating every layout as an isolated one-off calculation.

Plans and saving

Signed-out users can work in the demo project but work is not saved to an account. Free: 1 project, 1 area. Plus: unlimited projects, multiple areas per project. See full plan limits on the pricing page.

Calcufloor projects panel showing projects, areas, area totals, and saved room layouts.

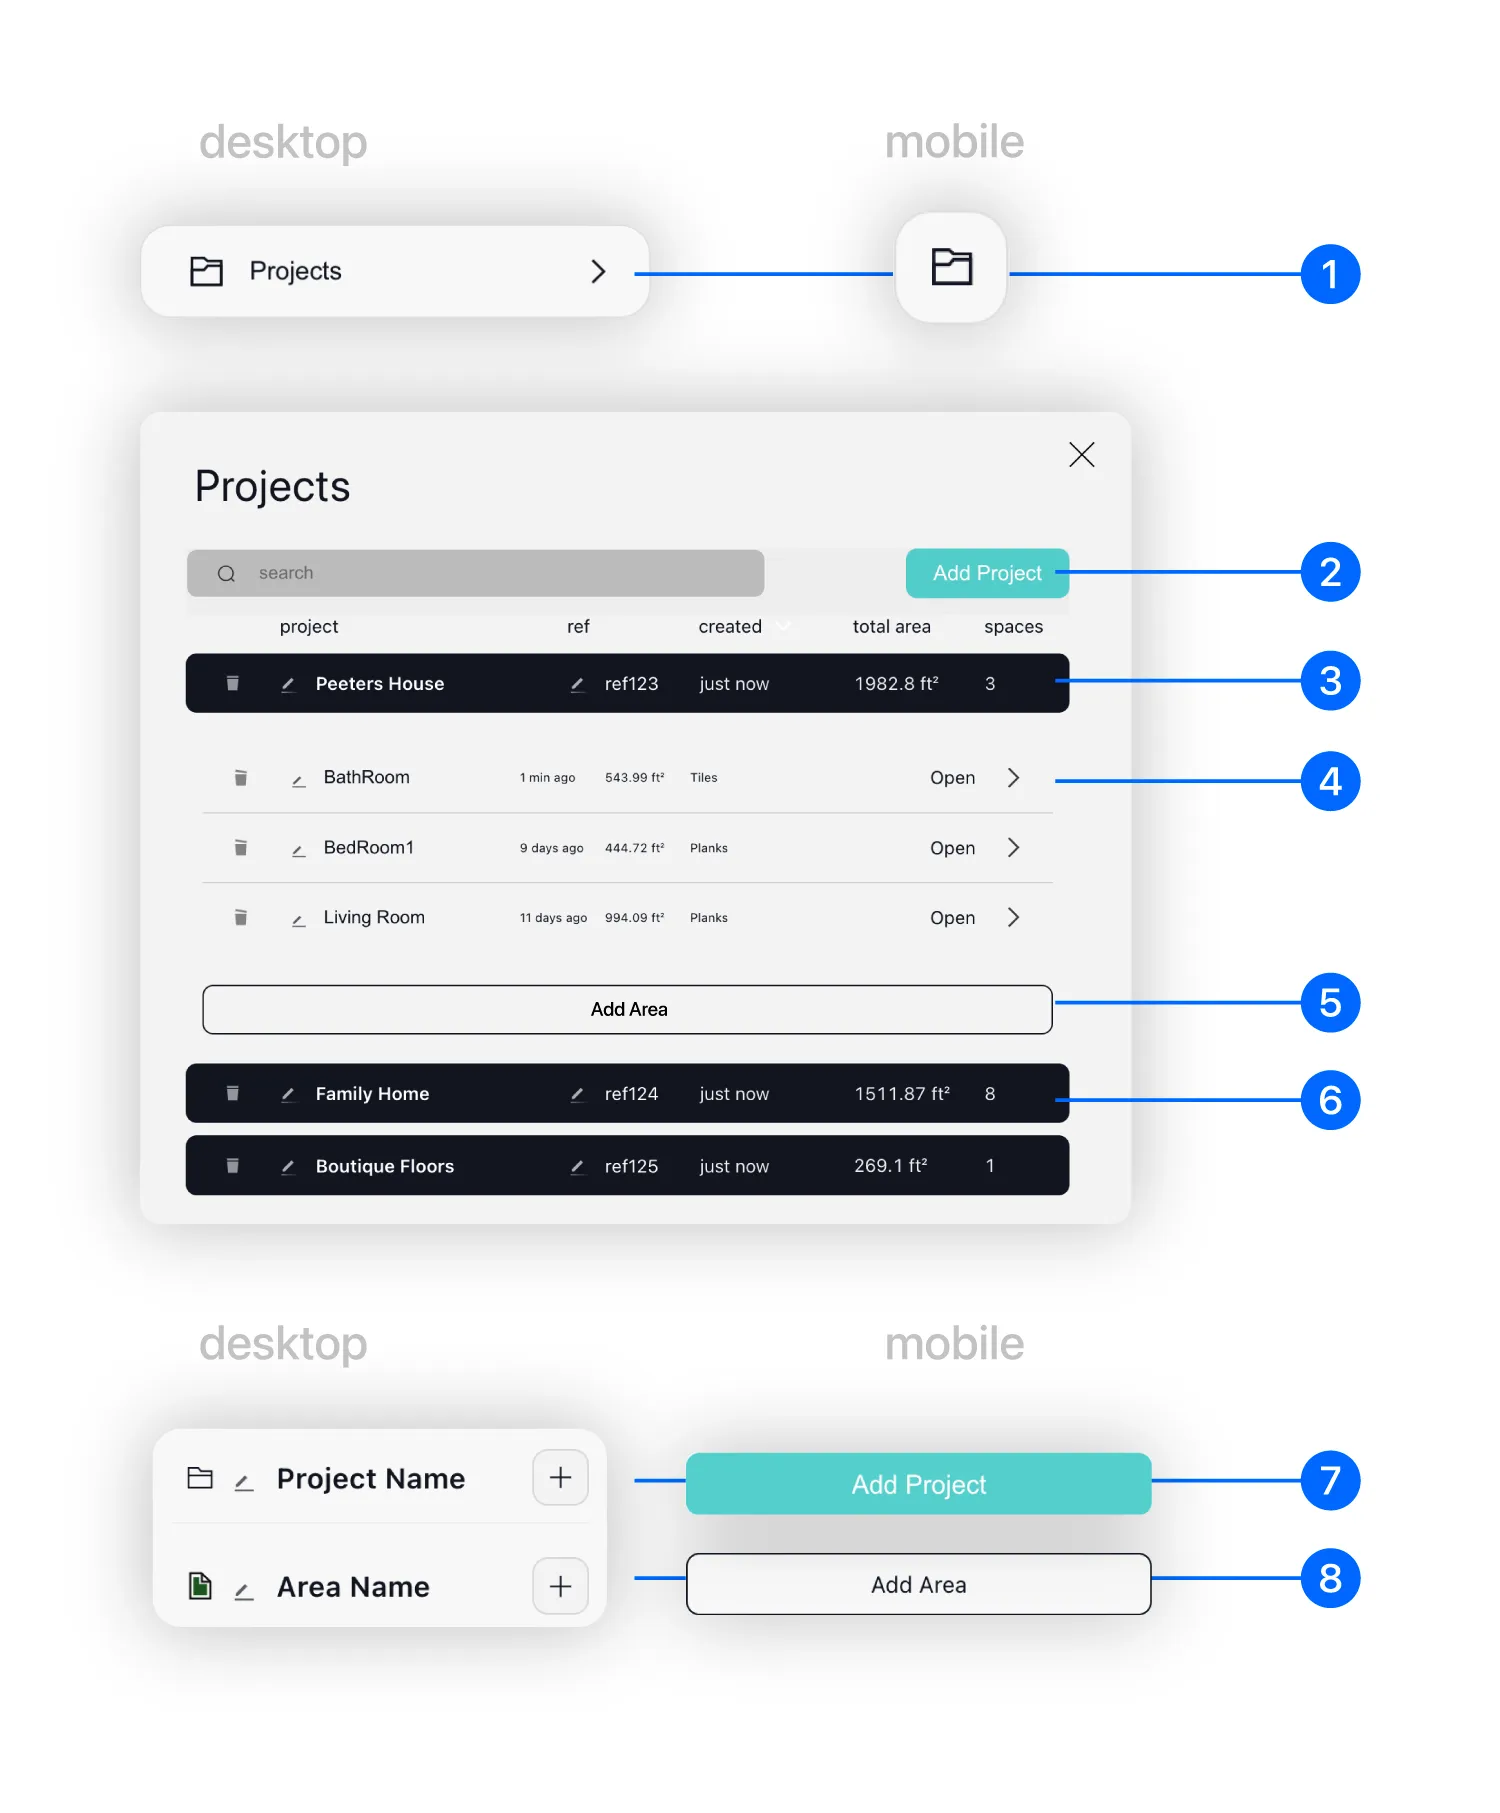
1. Opens the Projects panel.

2. Adds a new project.

3. Project row with ref, total area, and area count. Click to expand.

4. Area row with name, size, updated time, and layout type. Open loads the area.

5. Adds a new area.

6. Other project rows.

7. Quick add project.

8. Quick add area.

Use

How to use Calcufloor: from room shape to piece count

1. Space defines the room. 2. Layout generates the layout from the current mode, product inputs, and layout settings.

1. Draw the room

Define the room as its actual shape. You can edit corners, lengths, angles, openings, recesses, bumps, and excluded areas. That shape becomes the boundary used by the layout engine.

2. Choose planks or tiles

In 2. Layout, select the active layout mode. Plank layouts and tile layouts are generated by separate layout implementations, so the available settings and outputs depend on the selected mode.

3. Enter the product inputs

Enter the current plank or tile dimensions, pieces per box, and other relevant values such as spacing, thickness, cost, or underlay settings.

4. Set the layout controls

Set pattern, direction, and offset layout to control how the generated layout lands in the room and where cuts fall against the walls.

5. Inspect and read the result

Use center lines, show loss, and piece detail to inspect the generated layout. The side panel shows the resulting piece counts, boxes, surplus, and related quantities. If you change the room, the mode, the dimensions, the pattern, the direction, or the offset, Calcufloor regenerates the layout and updates the result.

Calcufloor workflow from drawing a room shape to generating the layout and reading piece counts.
Outputs

Plank and tile layout outputs: piece counts, boxes, surplus, and secondary quantities

The result panel combines direct layout outputs with related project calculations.

Planks mode

Outputs for plank layouts

Floor area

Total floor area of the defined room shape.

Skirting perimeter

Total wall perimeter used for skirting or baseboard calculation.

Pieces

Total number of planks required, counted from the generated layout.

Boxes

Number of boxes or packs based on pieces per box.

Surplus

Remaining pieces after pack rounding.

Material cost

Total material cost when a cost per box is entered.

Underlay

Underlay quantities when underlay is configured.

Piece detail

Cut information for an individual plank when selected in the layout.

Calcufloor plank layout result panel showing counts, packs, surplus, cost, and underlay.
Tiles mode

Outputs for tile layouts

Floor area

Total floor area of the defined room shape.

Skirting perimeter

Total wall perimeter used for skirting or baseboard calculation.

Pieces

Total number of tiles required, counted from the generated layout.

Boxes

Number of boxes or packs based on pieces per box.

Surplus

Remaining pieces after pack rounding.

Material cost

Total material cost when a cost per box is entered.

Adhesive

Adhesive quantity calculated from floor area and your adhesive application settings.

Joint fill

Joint fill or grout volume when tile thickness and joint width are configured.

Piece detail

Cut information for an individual tile when selected in the layout.

Calcufloor tile layout result panel showing counts, packs, surplus, cost, adhesive, and joint fill.
Calculation

How Calcufloor generates the layout and counts

Calcufloor reads the defined room shape, the selected mode, the product dimensions, and the current layout settings, then generates the layout inside that shape. The counts and related outputs are derived from that generated result.

Current state

The current room shape and the current settings define the layout input

1. Space defines the room geometry, 2. Layout defines the active mode, the product dimensions, and the current layout settings. Those values become the current input state for the layout generation.

In planks mode and tiles mode, separate layout implementations generate the layout from the current inputs.

Room shape and active layout settings used as inputs.
Pattern and direction

Pattern, direction, starter length, and offset control where seams and joints fall

In planks mode, the available patterns are free stagger, fixed stagger (1/2, 1/3, or 1/4 offset), herringbone, and double herringbone. In tiles mode, available patterns depend on the selected tile shape — square and rectangular tiles support grid, diamond, fixed stagger, herringbone, and double herringbone; hex tiles use hex-specific layouts.

Direction changes how the layout runs through the room. Offset layout shifts the generated layout against the room boundary. In free plank layouts, starter length sets the length of the first piece in each row, which determines where subsequent seams fall. Offset layout and starter length are separate controls: offset shifts the whole grid, starter length changes the seam pattern itself.

Pattern, direction, and offset affecting how the layout lands in the room.
Center lines

Center lines show row alignment and guide herringbone positioning

Calcufloor can draw center lines and measurement pills from the current layout. These guides update with the generated result, including when direction or layout offset changes.

They are there to help you inspect alignment and spacing in the generated layout, including patterns where center alignment matters, such as herringbone.

Center lines and measurement guides drawn over the generated layout.
Loss and reuse

Loss and reuse overlays show cut waste and where offcuts are reused

When show loss is enabled, Calcufloor draws the inside part of each piece, the cut-off part, and reused offcut areas as separate overlays.

This lets you inspect where material stays in the room, where it is cut away, and where a reused piece is part of the generated result.

Generated layout with loss and reuse overlays.
Piece detail

Individual pieces can be inspected in the layout view

With piece detail enabled, clicking any generated plank or tile in the layout view opens its cut information. This shows the exact dimensions of that specific piece as calculated against the room boundary.

The detail view is part of the layout UI, not a separate manual calculation. It reads from the currently generated layout.

Piece detail opened from a selected plank or tile in the generated layout.
Derivation

The counts follow from the generated layout

When the layout is generated, the interface updates the counts and related outputs from that result.

If you change the room, dimensions, spacing, pattern, direction, starter length, or offset, Calcufloor regenerates the layout and updates the result accordingly.

Recalculation

Piece counts update when you change room shape or layout settings

Calcufloor does not keep one fixed count and decorate it. It regenerates the layout from the current room and current settings.

The room shape, the selected mode, the product dimensions, the pattern, the direction, the spacing, the starter settings, and the layout offset all belong to the current layout state.

When one of those inputs changes, Calcufloor regenerates the layout and updates the counts and related outputs from that new result.

In practice: if you change the room, the piece size, the pattern, the direction, the starter length, or the offset, you change the generated layout. When the layout changes, the result changes.

UI

What the layout controls do

The layout view is the working view for checking and adjusting the generated result.

Direction

Direction changes how the generated layout runs through the room.

Offset layout

Offset layout shifts the generated layout against the room boundary. This affects where the first and last cuts land.

Center lines

Center lines show row guides and measurement pills from the current layout.

Show loss

Show loss reveals cut-off and reused areas in the generated layout.

Piece detail

With piece detail enabled, clicking a generated plank or tile opens its cut information for that specific piece.

Size details

Size details show dimension labels on the geometry and layout view.

Scope

What Calcufloor does not calculate: installation decisions remain yours

The generated layout is a planning result. Final site decisions still remain with the user.

Installation requirements remain separate from the layout result.

Manufacturer rules for expansion, substrate preparation, movement joints, and approved materials still apply.

You still decide the project buffer for breakage, defects, and future repairs.

FAQ

Common questions about how Calcufloor calculates flooring

Does Calcufloor use a fixed waste percentage?

No. Calcufloor derives piece counts from the actual generated layout. It does not apply a fixed percentage formula.

What is starter length and how does it affect a plank layout?

Starter length is a free plank layout control. It sets the length of the first plank in a row, which determines where every subsequent seam falls across the floor.

What does offset layout do?

Offset layout shifts the entire generated grid against the room boundary. Use it to control where the first and last cuts land against the walls.

Can I calculate layouts for rooms with recesses or excluded areas?

Yes. You can draw recesses, bumps, and excluded areas in the room shape. The layout engine trims pieces to fit the resulting boundary.

What is the difference between a project and an area in Calcufloor?

A project groups related areas. Each area stores its own room shape, layout settings, and piece counts independently. Free accounts can save one project with one area. Plus accounts can create unlimited projects with multiple areas per project.

Does changing the layout direction recalculate the piece count?

Yes. Changing direction, offset layout, pattern, or room shape triggers a full recalculation. In plank free stagger layouts, changing starter length also recalculates.

What does show loss display?

Show loss reveals cut-off waste and reused offcut areas in the generated layout.